Showing posts with label Mistakes. Show all posts

Monday, August 20, 2012

Fixing the Marantz

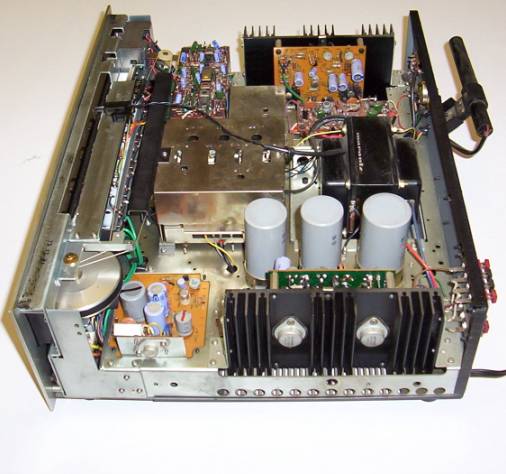
As I'm sure you are well aware of, I am going to college at UNT, and am staying in the dorms on campus. Now as great as my headphones are, I still like to listen to music through speakers every once in a while, and the speakers on my laptop don't cut it by a long shot. Because of this, I decided to bring my stereo up from home: the wonderful, magical, beautiful Marantz 2230.
The legendary Marantz 2230.
Look at those big, beautiful preamps attached to the heatsinks!
It may be from the 70's, and it may weigh over 30 lbs, but it sounds fantastic! Anyways, it worked great for the first semester and about half of the second, but then I noticed that something weird was happening: the left channel was getting quieter and quieter. I could compensate by adjusting the balance for a while, but the white noise due to turning it up so loud to compensate for the imbalance finally got so unbearable that I had to use headphones plugged directly into the computer for the rest of the semester. Finally, a few weeks ago, my dad and I decided that it was time to fix it. The first step was isolating the problem: we began by narrowing it down to the preamps, which made sense, as there was one for each channel.
 Luckily, we had not only the user manual (which actually came with a schematic), but also the service manual, which had schematics for each section as well as different values the components should read. We narrowed down the problem even more, figuring out which transistor made the left channel so much quieter than the right one. We started by replacing that transistor. No dice. We replaced a couple of capacitors, still nothing. Luckily, I remembered that we had another Marantz above the office more or less for parts, so I went up and brought it back down. We decided to just go ahead and replace the entire preamp, since by this time we were tired of troubleshooting. We cut the preamp loose, and proceeded to replace the preamp. My dad had been lamenting the length (or lack thereof) of the wire when trying to probe the preamp, so we decided to make sure there would be the perfect amount of wire to lay flat while working. After spending quite some time on that, we plugged the stereo back in and checked the signals. Same thing: the left channel was way quieter. We did find it fairly odd that both preamps had the same problem, but the parts unit had been above the office for so long that we had no idea what kind of condition it was in. We decided to cut the other preamp free from the parts unit to test, and this time use clip leads to connect them instead of soldering before testing. We hooked all the wires up, and it had the same problem! By this time, we began to suspect that maybe the left channel preamp wasn't the problem. We then decided to do what we should have done at the beginning: bring out the other Marantz 2230 we had (and knew worked), and compare the levels. As I'm sure you have figured out by now, the left channel was the correct volume, and the right channel was too loud! Once we finally figured that out, it was a relatively quick fix of replacing the right channel preamp. We got it put back together, and I now have a beautiful and fantastic sounding stereo to bring to college in a few weeks.

What I Would Do Differently

CLIP LEADS CLIP LEADS CLIP LEADS!!! Never again will I solder something like that again without first testing it with clip leads. I also would probably compare it with a known source if possible. Because it was important to compare known amplitudes, we used a function generator with the leads precariously clipped onto a headphone jack-to-stereo RCA cable. If I ever have to do something like this again, I definitely plan on making a BNC-to-stereo RCA cable; it would make the entire process much easier.

Edit: When I said we replaced the preamp, I was actually mistaken. What we actually replaced was the entire preamp and power module.

Monday, November 7, 2011

What I Did Friday

So last Friday, after I was done with classes for the day, I drove back home to (finally!) work on the cabinet some more. On the way home, I stopped at Home Depot to buy a scraper.
Wrong tool for the job!
Once I brought it home, I started working, and I did have the foresight to use it in an inconspicuous spot. I'm glad I did, because it immediately started gouging the MDF. I tried other tools including a block plane and a card scraper. The block plane took strips of paint off the likes of which I have only seen from a finely tuned smoothing plane, but only for about five passes; after that it wouldn't do anything. The card scraper didn't do much of anything. I took the scraper back to HD, and bought the correct one, along with some CitriStrip (paint stripper made for acrylic latex paint), a plastic scraper (CitriStrip recommended it), and a set of painter's pyramids (actually tetrahedrons).
 Once I finally got back to the house, I got cracking!
I started out by trying a test spot in the inside of the cabinet, and applied it with a paper towel. After I did that, and that worked successfully, I started on the rest of the cabinet. For the first side, I used a paper towel; once I finished that side, I decided that the paper towel was too much work.

Swirls don't matter, but work does!
Once again, I went to HD and got a 4" paint brush. That worked a lot better, and sped up the process immensely.
Much better!
 I spent until midnight scraping paint off. I still wasn't done, but decided to wait until morning to finish it. I had a guitar lesson back in Denton at 1:00, so I had to finish it pretty quickly. I ended up getting up at 11:00, so I didn't have much time to finish it, but I did manage.
Mostly done. Also, the scraper.
This was a very nasty job, and I hope I never have to do it again. This is definitely a lesson that a job is worth doing correctly the first time, even if it is harder; because now, I have to do that same job that I didn't want to do, except this time after doing that same job I don't like.

Wednesday, July 27, 2011

The T-Molding

As I said in my last post, I gave up on trying to drill the holes in the control panel. But I felt like I had to do something, so I installed the t-molding. It was a fairly straightforward process. All I used was a mallet and a box knife. The mallet is to hit the molding into place. The knife is for cutting the part that goes into the MDF, the | part of the T, if that makes sense. If it's an outside angle/radius, you have to cut some away, to basically keep it from running into itself, think about a miter, except it doesn't have to be precise. With an inside angle/radius, you have a couple of different options. The first is to just cut the molding like you did with the outside angle. The other option is to just cut slots in it, and since they are spreading out, they won't run into each other. Honestly, I went back and forth between the two. Another thing that came in handy was a piece of wood with a 45 degree angel on it. This was great for hammering the molding into corners.


After I got it in on both sides, I realized that I may have damaged the paint job slightly. It shouldn't be too bad, since my room isn't super bright, and should hide the flaws well enough.
Another thing I realized, and a lesson for you all, is that if you decide to make a MAME cabinet, make sure that the edge that the t-molding is going on is smooth. I thought I could get away with not working too hard on it, after all, I figured that the molding would cover most of the flaws. I was wrong. It's not super noticeable, but it is there: just a slight variation, almost a ripple.

Monday, June 27, 2011

Still Going Strong(ish)

It wasn't my original intention to only blog once a week, but that appears to be what is happening. Anyways, like last week, I have been working on it.

Here it is with the front, top, and diagonal attached. There really isn't a whole lot to say about this, except I did cut some angles to make it fit together better. The angle in front should help when I install the marquee and backlight.

 This is the "ventilation slot" I was talking about. If I had thought about it better, I might have cut a slot for T-molding to make it look nicer, but it is in the back after all, so it probably doesn't make a difference.

This is the template I used to route the holes, and it worked fairly well.

I did manage to get a TV finally. I had been looking on Craigslist, and maybe it's better when you want to pay for something, but people were so flaky, I probably sent out about 20 emails, and got back maybe about 3, with one being spam, and the others saying it was already taken. I eventually gave up and went to Goodwill. That's what I should have done from the beginning. I spent way too much time trying to save what turned out to be $25, and I really needed it to keep going. If anything, I actually went a little overboard with trying to find the best deal, and ended up with a 27" screen!
Sorry about the worse than usual picture quality, but anyway, this set me up for the next step.

This was to screw the TV shelf in place, but I wasn't sure where to locate the the shelf. When I got the TV, I was able to measure it, and figure that out. I decided to have it at a right angle to the slant on front, so hopefully the TV will be parallel with the bezel. Before I screwed it in, I screwed another piece of MDF to the bottom, kind of like I did the base, to help support the TV. You can kind of see it in the following picture.

I still didn't completely trust it, so I decided to glue cleats to the edges. At this point, I don't think it will budge at all.

I also decided to glue a cleat to the top of the shelf. This is to make sure that the TV doesn't slide back, since it will be at an angle. It should be plenty strong enough.

Around this time is when things started to fall apart a little bit. I had originally planned for the speakers to be 3" from the edges. This meant that the opposite side would be approximately 7" from the edge. That was before I took the bezel into account. I realized that if I kept the holes where they were, I would have to either cut out a place in the bezel for the speakers, or have no bezel at all. Both of these options were unacceptable of course, so I had to create new holes in the board. To do this of course, I also had to make a new routing template. Luckily, I was able to squeeze out what I needed from the same board I had used for the original measurements. The new holes were 1" from either edge.
 I got that routed, and also managed  to rout out part of my bench cookie in the act. It looks a little bit sad, but I learned my lesson, and hopefully will be able to keep from doing that again.
 Anyway, I did that, and cut the bevel, just like the last time, and screwed it in. That probably would have worked, but I have not mastered the fine art of drilling a straight hole yet apparently. I had also been using a bit that was too small, which had been working fine, although it has cracked the MDF slightly. All these combined problems caused the board to basically split. I tried to fix it by watering down some wood glue and injecting it into the hole, and that worked to make it stronger, but I couldn't clamp it good enough to more or less stuff the MDF back in. I eventually gave up and made another board.  Anyway, the picture is the only really good way to show what I am talking about with the splitting and blowout.
 You can see the more or less stain from the glue. You can also see the holes alternating sides. This is from my less than perfect drilling.
The sequence for making the second board is more or less the same, so I won't get into that too much, but I will note a few things I did differently the second time around. To start with, since the holes were already drilled in the side, I took a ruler, and marked a straight line centered on the holes, and then measured 3/8" down to put the board precisely in the middle. I also used a larger drill bit. For those keeping score, I went from a #40 to a #34. Both of these things helped keep the MDF from splitting. I also used 1 1/2" screws near the holes for the speakers, instead of 1 3/4", which is what I am using for the rest of the project.

The next thing I did was screw on the two back pieces. Also pretty straightforward. All I did was measure in 1/2" from the edge on the inside, and 7/8" from the edge on the outside. Clamp in place and drill, countersink, and screw. Done.

I also filled in the holes/countersinks with woodfiller. Both of the cans of Plastic Wood that we had were dried up, and my idea of MDF sawdust and wood glue didn't work as well as I hoped. So today I went out and bought a canister of Timbermate woodfiller, recommendation of the Wood Whisperer.
It worked very good. I had to put it on a second time, but I think that is more due to the fact that I have not yet mastered wood filler. I am almost done with the filler, I just need to finish sanding it down, and I should be ready to prime. Now I just need to turn my shop into an operating room, aka, clean it up really good, and I'll be ready to prime, then paint. Unfortunately, I only have tomorrow to work on it before I go to my college orientation, a 3-day live on campus ordeal. After that, my friend is coming in town, and I had hoped to have all the construction done and the cabinet hauled upstairs before he came, but it looks like I will have to rethink my strategy. On that note, anybody know of a non water-based primer that dries quickly?

Monday, June 20, 2011

Cool Stuff and More Work

Wow, it's been a while since I've posted! I got more supplies last Friday, but I had to leave before UPS came, or else I would have posted pictures, and the last few days, I have been blowing and going. Anyways, there were actually two different packages, but they just happened to come on the same day. The first box was from Rockler, which had the T-Molding and router bit. I took a picture of the box right when I got it, at first because I thought it was funny, but then I realized it was a good thing I did, and here's why:
This is pretty much exactly how it looked when I got it. The papers you see on top were in the box, but fell out when I picked it up to bring it inside. Like I said, at first I thought it was funny, but then I realized the router bit could have easily fallen out; luckily it didn't.

The other box I got was from Hagstrom Electronics, which contained the keyboard encoder, breakout board, and two PS/2 cables. I'll get into this more when I start wiring it up, but anyway, I got them.

Once I got the router bit, I could start on cutting the slots.

I started by making some test cuts in a scrap board to make sure it was centered. I did this by cutting a slot, it doesn't have to be very long, and then I took a piece of the T-Molding, and hammered it in, to see how centered it was. It took me quite a few tries to get it right, but I eventually did, and started on the big piece. Interestingly, when I started to cut the slot on the first side, despite the weight of all that MDF, it tried to shift on me. The solution? 50-pound weight to the rescue! It worked perfectly, and allowed me to easily rout the slot all around.


After I routed out the slot, I could get to work screwing it together. I had actually already drilled and countersunk the holes while I was waiting for the stuff to come, so it was a fairly quick assembly, except for one problem. I had planned for the base to be flush with the sides, but when I got it together, one side was further forward than the base, and the other side was too far back. After thinking about it for a while, I ended up planing/shaving/sanding the base down on the other side, so that it looked about the same on both sides.

This is the side of the base that was too far back.

And this is the side of the base that I had to plane down.

Here it is standing up. The board on the back is just clamped on to provide rigidity while I got the other pieces screwed in. It's at this point that you really start to realize how massive this thing is.

I am actually farther than I have pictures of. I have the front screwed in, as well as the top and diagonal piece.
And now, for the mistakes I made. When I was cutting the sides out, I misread the measurement on the plans and had the diagonal cut as 18" from the corner on either side, as opposed to 16", which is what it should have been. What this means is that I had to cut the top piece down to 7" from 9". This also means that the diagonal is too short, but in the spirit of engineers everywhere, it's not a flaw, it's a feature, it makes for better ventilation! I also failed to read the instructions that said to cut a slot for the T-molding in the base, but it's too late for that. I'm sure it will look fine, but I wish I had noticed that. I don't know if I would call it a mistake exactly, but I wasn't exactly consistent in whether I glued-and-screwed, or just screwed. A mistake I did make was when I was drilled the holes in the top piece. I started by drilling the front screw on either side, but I failed to clamp it the whole time. This  made the board sag in the back a little when I drilled the back holes, and in turn screwed it in. Once I noticed this, I backed the rear screws out, lined it back up, and clamped it down hard, and re-screwed it. Of course later I realized I needed to cut a bevel on the front edge of the top piece, and when I took it off, there were cracks in the sides. It may have been fine had I done nothing, but I decided to water down some wood glue, and drizzled that on the edges. I would recommend using a brush of some kind, but I couldn't find one, and this worked fine. The MDF is so porous that it soaked it right up. I'll see how it turns out tomorrow. I also made a template out of 1/4" plywood for the speaker holes, and I can make those holes tomorrow as well. All I did was mark out a circle with a compass, and once I did that, I drilled holes all the way around and used a coping saw to saw out the middle circle. After that, I put a drum sander on the drill press, and sanded to the line. There are definitely much better ways to do this, but it doesn't have to be too precise, as there will be a grill covering it up.